PS2 Linux Programming
Setting-Up Quad Buffers in VU Data Memory
Introduction
This tutorial demonstrates the rendering of a large number of triangles per frame (~130,000) using a quad buffered VU data memory layout. With quad buffering, VU memory is split into two main buffer areas with each of the main buffers being further subdivided into two smaller buffers. Vertex data can be processed in one buffer whilst the next chunk of untransformed vertex data is being uploaded into the other buffer. This scheme enhances vertex throughput by utilising the parallelism of the PS2 architecture.
VU Data Memory Layout
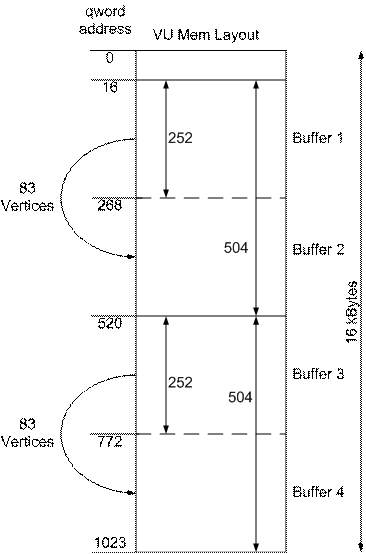
The layout of VU data memory is shown in the diagram below. Information required to transform the vertex data is contained within the first 16 qwords of memory, leaving 252 qwords for each of the four buffers. Two qwords of miscellaneous data (GIFTag and number of vertices) are send with each block to be processed leaving 250 qwords for the vertex data. Each vertex is described by three qword, texture coordinates, normals and position, meaning that it is possible to process 250/3 = 83 vertices per buffer.
The organisation of data within the first 16 qword of data memory is shown below.
|
Address |
Data |
|
0 |
Scaling Vector |
|
1 |
Directional Light Vector #1 (normalised) |
|
2 |
Directional Light Vector #2 (normalised) |
|
3 |
Directional Light Vector #3 (normalised) |
|
4 |
Light Colour #1 |
|
5 |
Light Colour #1 |
|
6 |
Light Colour #1 |
|
7 |
Ambient Light |
|
8 |
Transformation Matrix Row #0 |
|
9 |
Transformation Matrix Row #1 |
|
10 |
Transformation Matrix Row #2 |
|
11 |
Transformation Matrix Row #3 |
|
12 |
World Matrix Row #0 |
|
13 |
World Matrix Row #1 |
|
14 |
World Matrix Row #2 |
|
15 |
World Matrix Row #3 |
The Scaling vector, light directional vectors and light colours do not change and are loaded once into a static DMA packet for uploading. The transformation matrix and world matrix change from frame to frame and are calculated during the game loop prior to uploading.
The vertex data for the patch to be rendered is pre-processed prior to entering the game loop. The vertex data is split into chunks of 83 vertices and is preceded by two qwords, the first indicating how many vertices are in the chunk, the second being the GIFTag for the chunk. Notice that the PRIM register is not set with the GIFTag since a new triangle strip would be started with each chunk, causing some triangles to be missed out. The PRIM register is set in A_D mode just before the vertex data is sent to the VU – this can be seen at the end of the game loop.
When building the packets for each buffer, a VIFCode is entered at the start of the packet to unpack the correct amount of data. Within the UNPACK VIFCode the FLG is set to 1 indicating that the data should be unpacked by adding the immediate address in the unpack VIFCode to the TOPS register within VU1. The significance of this will become apparent when the VU code is investigated, but in essence it allows the packet data to be unpacked to alternate buffers after each upload. At the end of the data chunk, the VIFCode to run the VU micro program is inserted into the data. For the first chunk of vertex data the VU program is started at address zero (MSCALL(0)) and for all subsequent chunks an MSCNT VIFCode is used. MSCNT forces the VU program to restart from where it was paused. The reason for this change from MSCALL(0) to MSCNT is that it is only necessary to load the matrix data into VU registers once, this being accomplished by running the VU program from address 0. Also notice that the two main buffers within VU data memory are configured at the start of the data packet with VIFCodes BASE(16) and OFFSET(504). This sets the base address of the buffers to 16 and the size of the buffers to 504 as indicated in the VU data memory layout above.
Creating the Patch
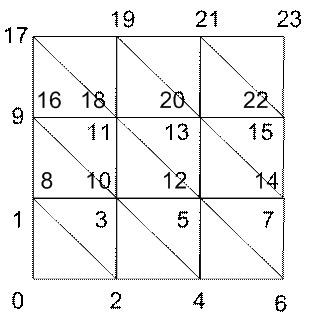
The patch being rendered is a continuous triangle strip configured in an array of triangles. The actual patch is 256 by 256 (iSizeX by iSizeY) vertices, but to illustrate the construction process a patch of size 4 by 4 vertices is illustrated above. The number of vertices needed to render the patch is (iSizeX * 2) * (1 – iSizeY) which in the case of the 4x4 patch is 24 vertices and in the case of the 256x256 patch is 130,560 vertices.
The patch is created by zigzagging from left to right making a triangle strip. In the above example, the drawing kick is disabled when moving from vertex 7 to 8 ( and 15 to 16) so that the triangle generated by vertices 6, 7 and 8 (and 14, 15 and 16) is not drawn. A flag to indicate whether the triangle should be rendered or not is inserted into the vector holding the texture coordinate, since only 3 of the 4 available floating point numbers are needed to specify the texture coordinate. This flag is used in the VU program to set the ADC bit for the appropriate vertex, preventing the triangle from being drawn.
The VU Micro Program
Much of the detail of the micro program has been described in previous tutorials, and only the new features will be described here. At the start of the program it can be seen that there are a number of defines:
; The static (or initialisation buffer) i.e. stuff that doesn't change for each
; time this code is called.
Scales .assign 0
LightDirs .assign 1
LightCols .assign 4
Transform .assign 8
LightTrans .assign 12
; The input buffer (relative to the start of one of the double buffers)
NumVerts .assign 0
GifPacket .assign 1
UVStart .assign 2
NormStart .assign 3
VertStart .assign 4
; The output buffer (relative to the start of one of the double buffers)
GifPacketOut .assign 253
UVStartOut .assign 254
NormStartOut .assign 255
VertStartOut .assign 256
The first group specify the locations of the transformation data that does not change. This information is uploaded to VU memory once only at the start of the patch rendering process. The next group of defines specifies the position of the data uploaded into the input buffer. This buffer contains the number of vertices to be process, the GIFTag then the vertex data in the order texture coordinate followed by normal followed by position. The final group of defines specify the data format in the output buffer which consists of the GIFTag followed by the texture coordinate, normal then position.
The entry point to the program is illustrated below:
--enter
--endenter
START:
fcset 0x000000
lq fTransform[0], Transform+0(vi00)
lq fTransform[1], Transform+1(vi00)
lq fTransform[2], Transform+2(vi00)
lq fTransform[3], Transform+3(vi00)
lq fLightTrans[0], LightTrans+0(vi00)
lq fLightTrans[1], LightTrans+1(vi00)
lq fLightTrans[2], LightTrans+2(vi00)
lq fScales, Scales(vi00)
This loads the transformation and lighting matrices and the scale vector into 128bit floating point registers within the VU.
Now comes the new part shown below:
begin:
xtop iDBOffset;
ilw.x iNumVerts, NumVerts(iDBOffset)
iadd iNumVerts, iNumVerts, iDBOffset
iadd Counter, vi00, iDBOffset
The different main buffers are selected by reading the current offset from TOP register within VIF1. This is accomplished by the instruction xtop iDBOffset which loads the contents of the TOP register into the specified integer register (iDBOffset). The TOP register was initialised with the BASE and OFFSET VIFCodes that were sent to VIF1 right at the start of rendering the patch. Also note that the value in the TOP register is automatically swapped each time a MSCALL or MSCNT VIFCOde is received. Following the xtops instruction, the number of vertices to be processed is loaded from memory then added to the current offset from the TOP register; this is used as the end condition for looping through the vertices. A counter register is then initialised with the current value from the TOP register.
The main vertex transformation and lighting code is identical to that seen before. Towards the end of the processing the following section of new code is encountered.
iaddiu Counter, Counter, 3
ibne Counter, iNumVerts, loop
iaddiu iKick, iDBOffset, GifPacketOut
lq GP, GifPacket(iDBOffset)
sq GP, GifPacketOut(iDBOffset)
xgkick iKick
--cont
b begin
--exit
--endexit
Here the loop counter is checked to see if all of the vertices have been processed. If they have, the GIFTag is loaded from the input buffer and stored in the output buffer then the packet is sent to the Graphics Synthesiser with the xgkick instruction.
Now comes another new and very important part. The –-cont directive causes the VU program to pause at this point and wait to be activated again. The VIFCode that reactivates the VU Program is MSCNT which continues the VU program from where it was paused. It can be seen that on reactivation the program will loop back to the begin label and start processing the next buffer or information which will have been getting uploaded into the this buffer whilst the previous buffer was being transformed.
If the construction of the chunks of vertex data (packets) is investigated in the main program, it will be seen that there is no need to insert a FLUSH VIFode between the packets to be uploaded to the VU. This is due to the quad buffer setup where it is now possible to upload data into one buffer whilst the other buffer is being processed. Also, a third parallel process is going on, that being the rendering by the graphics synthesiser. It is important to mention that the xgkick instruction in the vector code will stall if the previous xgkick has not finished to make sure that the VU processing does not get ahead of itself.
Conclusions
This tutorial has demonstrated a quad buffered VU processing scheme where vertex data can be uploaded to the VU, processed by the VU and rendered by the GS all in paralled.
Dr Henry S Fortuna
University of Abertay Dundee